The output of git status.
Chapel Field Christian Schools
Git is a type of version control system. We use version control systems to help us track the changes to programs, documents, and other forms of information. This allows us to undo mistakes in our work and preserve the history of our information if we need to refer to it. Git is also the foundation for collaborative software development sites like Github, Gitlab, and BitBucket.
We're going to learn how to properly use Git from the command line. Get out your Git Cheat Sheet and highlight
the following commands since you'll use them all the time: git pull, git add, git commit,
and git push.
Download Git and install it. The only option you should change is the default editor. I recommend Visual Studio Code since we will be using it as our primary editor for this class. Otherwise, accept the default options.
Although you may have already configured Git for this class, go ahead and double-check your settings. Open Git Bash from the Start Menu.
Type git config --global user.name "Your Name", replacing "Your Name" with your
actual first and last name. Then press Enter. This helps other developers know who made the changes in the Git
repository.
Type git config --global user.email "yourname@students.chapelfield.org", replacing
"yourname@students.chapelfield.org" with your school email address. Then press Enter. This helps
other developers know where to contact you.
Type git config --global color.ui auto and press Enter. This adds some color to the command line
output to help you read it more easily.
Then type git config --list and press Enter to make sure you've set everything properly.
Raise your hand and have Mr. Olinda verify this checkpoint. Alternatively, you may record your screen as you complete each step from this checkpoint and submit the videos for credit.
Watch the two videos below to learn what version control and Git are conceptually (subtitles are available):
Go to the Getting Started with Git tutorial and complete it. Continue through all the tutorials.
Raise your hand and have Mr. Olinda verify this checkpoint. Alternatively, you may record your screen as you complete each step from this checkpoint and submit the videos for credit.
Now we're going to try this for real. Open Git Bash (or Terminal on Mac) and type mkdir projects
and press Enter. Then use cd to enter the "projects" directory and type git init usingGit
and press Enter. You've just created a repository called "usingGit" on your computer.
Make sure you're still in the "projects" directory and type git clone https://github.com/jackivan88/csp2018-19.git
and press Enter. You may be asked for your Github username and password.
Then use cd and ls to check out the contents of both the "usingGit" and
"csp2018-19" directories. What is in each one?
Raise your hand and have Mr. Olinda verify this checkpoint. Alternatively, you may record your screen as you complete each step from this checkpoint and submit the videos for credit.
In Git Bash, go to your "usingGit" repository. Type git status and press Enter. You should see a
message telling you there are no changes. Now type touch first.txt and press Enter. Then type
vim first.txt and press Enter. You'll now see a different interface. This is the Vim text editor
installed on almost every Unix or Linux machine. Another one you might see is Nano. To edit the file, you need
to change to "insert" mode by pressing the letter i on your keyboard.
Now that you're in insert mode, type Here is some text. into the file. Then press Escape on your
keyboard to go back to normal mode. Then type :wq and press Enter to save (write) your changes and
quit Vim.
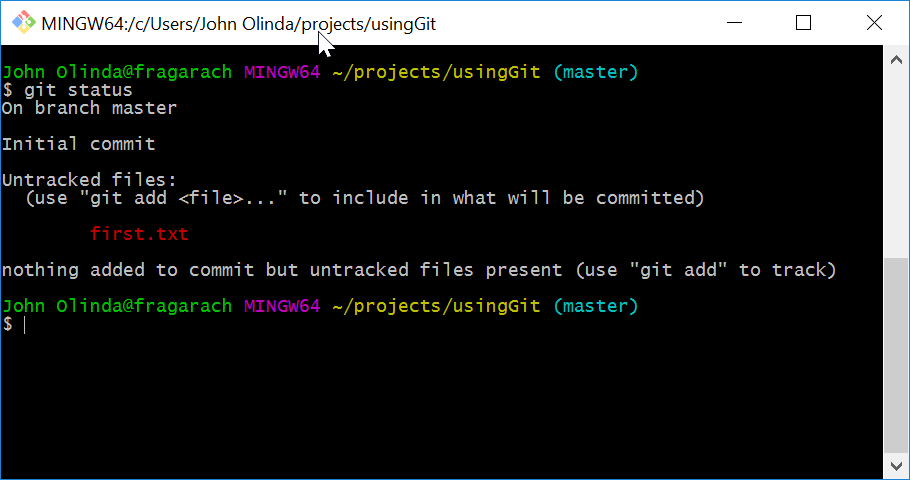
Now type git status and press Enter. You should see something similar to this:

The output of git status.
You'll notice that it gives you instructions on what to do next. Go ahead and type git add first.txt
and press Enter to add the file to version control. Then use git status again to see what's
changed.
Then type git commit -m "Add first.txt to version control" and press Enter. This records
the current version of the file in Git. The -m flag tells Git you are going to type a message
after the command. If you don't use the -m flag then it will bring up a Vim window where you can
type your message.
Raise your hand and have Mr. Olinda verify this checkpoint. Alternatively, you may record your screen as you complete each step from this checkpoint and submit the videos for credit.
Sometimes we need to work on certain parts of a project without disturbing the master version, which is called
the "master branch" in Git. To do that, simply type git branch special and press Enter.
Now type git branch to see the branches in your repository. The one you're currently on is green.
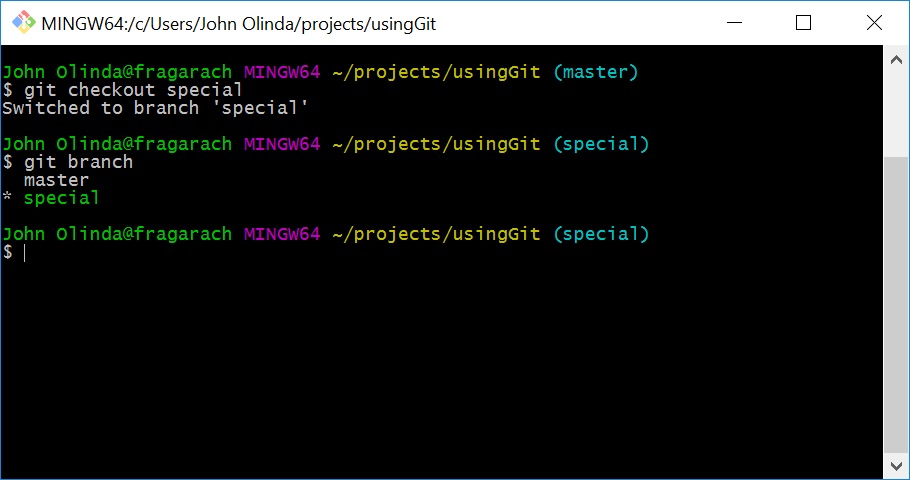
Now type git checkout special and press Enter to switch the the special branch. Use git branch
again to see what's changed.

Git checkout changes.
Now, type vim second.txt and press Enter. Add some text to the file just like you did last time and
save it. Then use git add and git commit -m to save the new file into Git. Then type
git checkout master and press Enter to switch back to the master branch.
Type git merge special and press Enter. This pulls all the information you created in the
"special" branch into the "master" branch. If you visualize this, it is like a road that
goes from one lane to two lanes, and then back to one lane. The information is split into two (or more
branches) and then brought back into one.
Raise your hand and have Mr. Olinda verify this checkpoint. Alternatively, you may record your screen as you complete each step from this checkpoint and submit the videos for credit.
You already know how to delete and rename files using rm and mv. When you're working
with files in Git, you can use those tools, but it's better to use git rm and git mv
to save some steps.
Type touch deleteThisFile.txt renameThisFile.txt and press Enter. Then type git add *
to add all untracked files to version control. Then use git commit -m to save your changes.
Type git rm deleteThisFile.txt and press Enter. This command both removes the file from the
directory and also tells Git about the change. Use git status to see the effects of this command.
If you just wanted to remove the file from version control without deleting the file, you would use git rm --cached.
Use git commit -m to save your changes.
Type git mv renameThisFile.txt third.txt and press Enter. This renames the file and tells Git about
the change. Use git status to see the effects of this command.
Use git commit -m to save your changes.
Raise your hand and have Mr. Olinda verify this checkpoint. Alternatively, you may record your screen as you complete each step from this checkpoint and submit the videos for credit.
Git can be configured to ignore certain files, types of files, or directories. This can be helpful if you're working on a group project and are keeping notes in the directory that aren't going to help other users. You need it, but other people don't, so you configure Git to ignore it.
First, create a new file called "ignore.txt" in your "usingGit" directory. Then type vim .gitignore
and press Enter. Once you're in Vim, press i to enter the editing mode and type ignore.txt. Then
press Escape and type :wq and press Enter to save and quit Vim. Now, when you use git status, you
should only see the new .gitignore file to be added. Use git add to track this file and then
commit it.
Raise your hand and have Mr. Olinda verify this checkpoint. Alternatively, you may record your screen as you complete each step from this checkpoint and submit the videos for credit.
When you make changes to a repository, but you haven't committed them yet, you can store the changes and changed (or even deleted) files without deleting them permanently. This allows you to save them to apply them later, even after another commit.
First, create three text files using touch and then add them to Git. Now, if you use git status
you'll see the pending changes. But instead of using git commit, type git stash save.
You'll see a message explaining where the files are located. Now use ls to verify the new files
aren't present. The directory should look just like it did after your last commit. Type git stash pop
to bring the files back. Use ls to make sure it worked.
Then, add and commit the new files. Now use git rm to delete all three files in one command. But
before you commit, use git stash (you don't have to type "save" at the end) to save the
changes in memory and restore the directory to your last commit. Now, you should see the files back in place.
Using git stash pop will delete them again. Go ahead and add and commit the changes.
Raise your hand and have Mr. Olinda verify this checkpoint. Alternatively, you may record your screen as you complete each step from this checkpoint and submit the videos for credit.
Especially when you're working with other people, it is important to find out when certain changes were made and
who made them. This is when you use git log.
Type git log and press Enter to see what happens. The output is "piped" into less, so you
can scroll through it with the Space Bar and press q to quit. All the commits should be by you, of course.
Now, type git log --grep= and add a search word. Grep is a search tool used in Unix and Linux
systems. If any commits match that word, they will appear when you press Enter. Now figure out how to search
for more than one word at a time. Then type git log --help and press Enter to open the manual page
in your browser. Try at least two other options for searching through the history of your repository.
Raise your hand and have Mr. Olinda verify this checkpoint. Alternatively, you may record your screen as you complete each step from this checkpoint and submit the videos for credit.
Sometimes you'll make a mistake and not realize it until after you commit. You have two options. You can reset the commit history back to a chosen commit and preserve your files, or you can reset back to a chosen commit and remove all the file changes since then.
Go ahead and create several new text files, add them, and commit them. Then edit the files using Vim so that all of the new files contain different text. Then commit them.
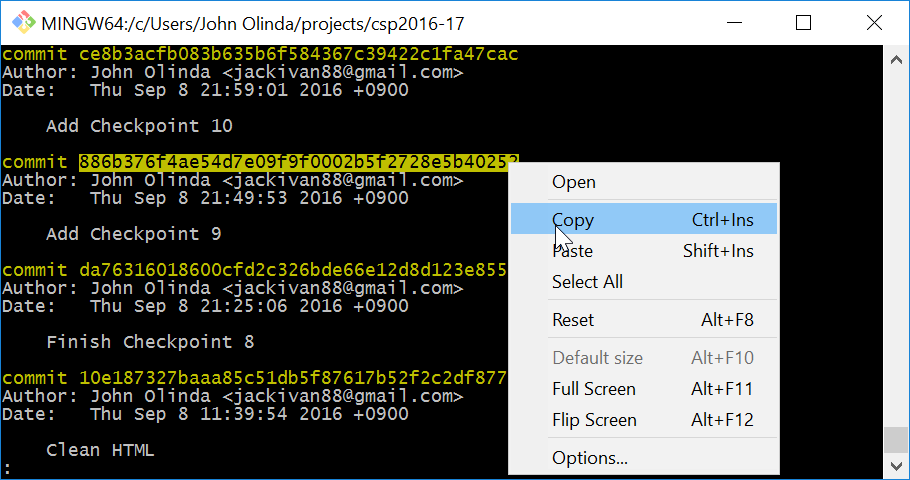
Now use git log to pull up your commit history. Choose the second-most-recent commit (yours will be
different than the example below) and highlight the commit ID. Then copy it.

Highlight and copy a commit ID
Now type git reset and paste in the commit ID you just copied. This will undo your last commit but
save the files that you changed.
Now use git log to pull up your commit history. Choose the second-most-recent commit and highlight
the commit ID. Then copy it.
Now type git reset --hard and paste in the commit ID you just copied. This will undo the last
commit and also remove the files. Your directory should now appear as it did at the end of Checkpoint 10.
Raise your hand and have Mr. Olinda verify this checkpoint. Alternatively, you may record your screen as you complete each step from this checkpoint and submit the videos for credit.
When you're working with a remote repository, meaning one that is hosted on a different computer than yours, you
must sync it if you want your changes to be reflected for other users. The two most commonly used tools for
syncing are git pull and git push.
Change to the "csp2018-19" directory. Then type git pull. You should see a number of
changes added to your copy of the repository. You are now synced with my copy of the course website. In fact,
you can open this lesson in your browser by going to the directory in Windows Explorer or Finder and opening
usingGit.html.
Now you should change to the "usingGitPush" subdirectory and create a text file. The file should be
yourName.txt, replacing "yourName" with your name. Then add and commit the file, and type git push
and press Enter. If you get an error saying that you are behind the current commit, then type git pull --rebase
and press Enter. Then type git push and press Enter.
Raise your hand and have Mr. Olinda verify this checkpoint. Alternatively, you may record your screen as you complete each step from this checkpoint and submit the videos for credit.
There are seven rules for good Git commits. Read this excellent explanation of the seven rules by Chris Beams. Basically, you need to make sure that your commits:
Note that rules one, six, and seven only apply when you're writing a commit message that has a body. Most of your commits won't. Create a text file in your "usingGit" repository that contains the seven rules and then add and commit it. Make sure your commit message follows the seven rules exactly.
Raise your hand and have Mr. Olinda verify this checkpoint. Alternatively, you may record your screen as you complete each step from this checkpoint and submit the videos for credit.